Sometimes a customer will have multiple sales returns and it can be a real chore. Using the ‘Get Posted Document Lines to Reverse’ feature in Sales Credit Memos can be a great time saver.
Let’s create a new sales credit memo by entering Sales Credit Memo in the search box or navigating to /Departments/Sales & Marketing/Order Processing and choosing Sales Credit Memos from Lists.
Click the NEW button on the Home ribbon and we’ll get started.
Either manually enter a credit memo number or the system can generate one for us. In the
Sell-to Customer No. field, enter the customer number.

If you have one or two lines or an ad hoc credit to issue, manual input is fine. But when you have multiple lines of detail it is much cleaner and accurate to use the ‘Get Posted Document Lines to Reverse’.
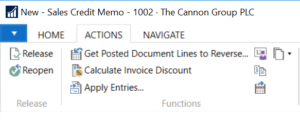
From the Actions Ribbon select ‘Get Posted Document Lines to Reverse.
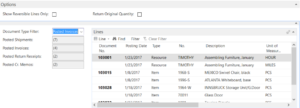
From the lines, choose the lines which require a credit and click OK. Be mindful if you have multiple warehouses because the return location will be the same as the original.
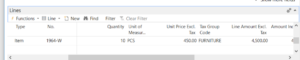
Sales Credit Memo Lines
From the Action Ribbon, chose Release and Post.
And remember, if the ‘
Return Receipt on Credit Memo’ field is selected in the Sales & Receivables setup, a posted return receipt will be created when the credit memo is posted.


Leave A Comment